Browned Butter Chocolate Chip Cookies
The Ultimate Guide to Browned Butter Chocolate Chip Cookies: Why You’ll Never Go Back
There is a specific smell that makes a house feel like a home. It’s not just the scent of sugar baking in the oven; it’s the deep, nutty, toasted aroma of browned butter.
If you have been making standard chocolate chip cookies your whole life, I am about to ruin them for you—in the best way possible. Once you learn how to brown your butter, a regular cookie tastes a little bit “flat.” Adding that liquid gold to your dough creates a cookie with crispy edges, a chewy center, and a flavor that tastes like high-end toffee.
Let’s dive into why this one simple step changes everything and how you can master the art of the perfect cookie right in your own kitchen.
Why Butter Temperature Actually Matters
Before we get into the “how-to,” we need to talk about the “why.” In baking, butter isn’t just a flavor; it’s a structural engineer. Whether your butter is cold, room temperature, or melted and browned changes the entire DNA of your cookie.
Here is a quick breakdown of how the state of your butter affects your final bake:
| Butter State | Texture Result | Flavor Profile |
| Cold (Chunky) | Flaky, puffed, and biscuit-like. | Clean, milky butter flavor. |
| Room Temp (Soft) | Classic “bakery” soft texture; holds air when creamed. | Sweet and balanced. |
| Melted (Liquid) | Chewy, dense, and slightly greasy (in a good way). | Rich and heavy. |
| Browned (Liquid Gold) | Crispy edges, ultra-chewy centers, and fudgy. | Intense toasted nut, caramel, and toffee. |
When we brown the butter, we are cooking out the water content. This means the fats and milk solids are more concentrated. When this hits the flour and sugar, it creates a much denser, richer crumb than a standard “creamed” cookie.
The Magic of the “Browned” Phase
You might be wondering, “Is it really worth the extra ten minutes?” The answer is a resounding yes.
When you melt butter on the stove, the water evaporates. Then, the milk solids begin to toast. This is called the Maillard reaction. It’s the same chemical process that makes a seared steak taste better than a boiled one. You are essentially caramelizing the dairy.
In a cookie, this reacts with the brown sugar to create a deep, complex flavor that usually requires days of aging the dough to achieve. With browned butter, you get that “aged” gourmet flavor instantly.
How to Brown Butter (And Save it for Later!)
Browning butter is easy, but it requires your full attention. It goes from “perfectly toasted” to “burnt and bitter” in about five seconds.
The Pro-Tip Insert: The Browning Method
- Melt: Place your unsalted butter in a light-colored skillet (this helps you see the color change). Melt it over medium heat.
- Sizzle: The butter will begin to bubble and pop. This is the water cooking out.
- Foam: After the popping stops, a foam will rise to the top. This is the “danger zone”—it’s about to happen!
- Swirl: Watch for little brown specks to form at the bottom. The liquid will turn an amber color and smell like toasted hazelnuts.
- Cool: Immediately pour the butter (and all those tasty brown bits!) into a heat-safe bowl to stop the cooking.
Storing for Later:
You can brown butter in large batches! Once cooled, pour it into glass jars or silicone ice cube trays. It stays fresh in the fridge for 2 weeks or the freezer for 3 months. When you’re ready to bake, just melt it down or let it soften to room temp!
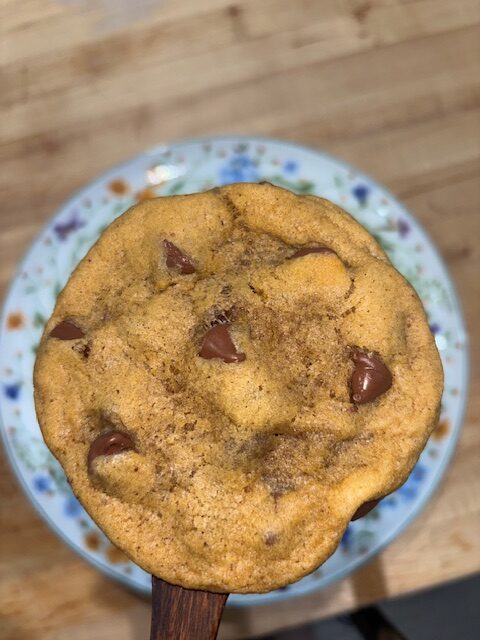
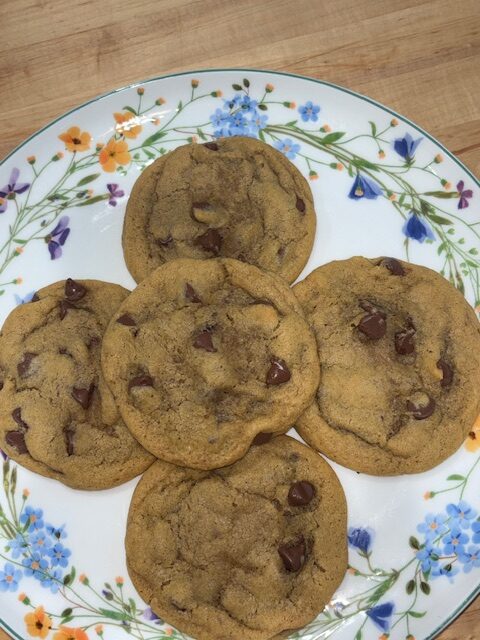
The Ultimate Browned Butter Chocolate Chip Cookie Recipe
This recipe is designed for those who love a “puddle” of chocolate and a sprinkle of sea salt.
Step-By-Step Instructions
1. Brown the Butter
Follow the guide above. Once your butter is browned and smelling heavenly, let it cool for about 15 minutes. You don’t want it to be boiling hot when you add the sugar, or it will dissolve the sugar too quickly and make the cookies greasy.
2. Mix the Sugars and Fats
Whisk your cooled browned butter with the brown sugar and white sugar. Since the butter is liquid, you don’t need a heavy stand mixer—a hand whisk works great! Whisk until the mixture looks like wet sand.
3. Add the Eggs and Vanilla
Add the eggs, and the vanilla. Whisk vigorously for about 1 to 2 minutes. You’ll notice the mixture starts to turn a bit lighter in color. This builds a little bit of structure so the cookies don’t spread into pancakes.
4. The Dry Ingredients
Fold in your flour, baking soda, and salt using a spatula. Mix until just combined. If you see a few streaks of flour left, that’s actually perfect—stop there! Over-mixing makes for tough, bread-like cookies.
5. The Chocolate
Fold in your chocolate chunks. If you want those “Instagram-worthy” puddles of chocolate, use a chopped-up chocolate bar rather than chips. Chips have stabilizers that keep them in a “tear-drop” shape; bar chocolate melts into beautiful pools.
6. The Chill (optional)
I know, I know. You want cookies now. But if you scoop this dough and bake it immediately, the browned butter will cause them to spread too thin. Cover the bowl and let it sit in the fridge for at least 30 minutes. An hour is better. Overnight is legendary.
7. Bake
Preheat your oven to 350°F. Scoop rounded tablespoons of dough onto a parchment-lined sheet. Bake for 12-13 minutes. The edges should be golden brown, but the centers should still look slightly “underdone.”
8. The Finishing Touch
As soon as they come out, sprinkle a tiny pinch of flaky sea salt on top. Let them sit on the hot pan for 5 minutes to finish setting up before moving them to a cooling rack.
Tips for Success
- Don’t Leave the Bits: Those little brown specks at the bottom of the pan? That’s where 90% of the flavor is. Scrape the pan with a spatula to make sure every single speck gets into your dough.
- The Pan Bang: About 8 minutes into baking, lift the cookie sheet an inch off the oven rack and drop it. This “bangs” the air out of the cookies, creating those beautiful ripples and a chewier texture.
- Measure by Weight: If you have a kitchen scale, use it! 2 ¼ cups of flour is roughly 280 grams. If you pack your flour into a measuring cup, you might end up with too much, leading to a dry, cakey cookie.
Living the Slow Life
There is something so therapeutic about the process of browning butter. It forces you to slow down, to stand by the stove, to smell the changes in the air, and to put real intention into what you are making. In a world that moves so fast, taking ten extra minutes to toast your butter is a small act of “homestead magic” that makes a huge difference.
Whether you’re sharing these with your kids after school or packing them up for a neighbor, these cookies aren’t just snacks—they’re an experience. Remember, homesteading starts in the kitchen!
Happy baking!
Browned Butter Chocolate Chip Cookies
Equipment
- Stand mixer
- cookie tray
- Parchment Paper
Ingredients
- 1 cup browned butter-melted
- 1 cup brown sugar
- ½ cup granulated sugar
- 2 eggs
- 1 tsp vanilla
- 2 tsp baking soda
- 2 TBSP hot water
- 1 tsp salt
- 2½ cup flour
- 1 package chocolate chips
Instructions
- Cream together browned butter and both sugars.
- Add eggs and vanilla.
- Dissolve the baking soda into the hot water and add to the dough.
- Last, add salt and flour.
- Mix until combined.
- Roll into desired ball shapes and then bake at 350℉ for 12-14 minutes.
- Remove and let cool.